How to fill in the Vietnam Pre-Arrival Declaration
Vietnam’s portal calls it Pre-Arrival Information, and it is free on the official portal. After a CAPTCHA and a nationality page come three steps for as many travelers as you add: Passenger Information, Trip Information, and Review & Submit. You click Submit and enter the emailed code yourself. Below is every box, in order.
- Cost:Free
- Official site:prearrival.immigration.gov.vn
- Last checked:19 Sep 2026
What do you need before you start?
- Each traveler’s passport
- Your e-visa or visa, if you travel on one
- Your flight number and arrival airport, or by land and sea your vehicle’s number and border gate
- The address where you’ll stay, with its province or city and its ward or commune
- An email address you can open right away, and a phone number
What goes in Passenger Information?
The portal is at prearrival.immigration.gov.vn. Pick your language, then choose “Create & Submit Pre-arrival Information”.
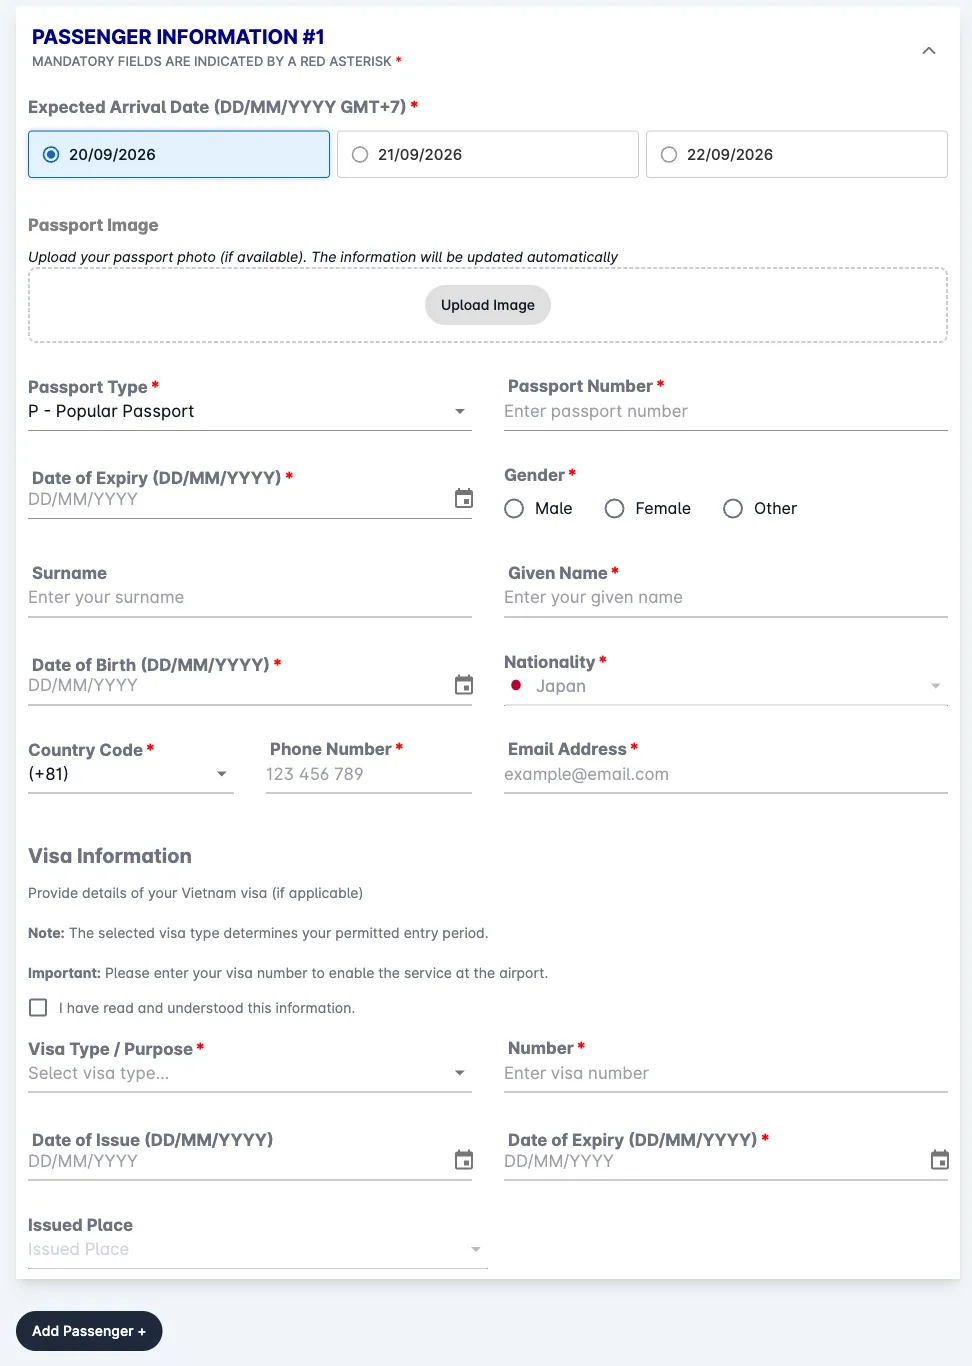
Expected Arrival Date (DD/MM/YYYY GMT+7)
Required · 3 date buttons: today, tomorrow, and the day after
Only the first passenger’s card has this box. Pick one of three buttons: today, tomorrow, or the day after. You can’t type a date. The label says GMT+7, but the buttons follow your device’s clock. If you arrive later than that, it’s too early to file.
Passport Image
Optional
Its note reads “Upload your passport photo (if available). The information will be updated automatically”. You can skip it and type your details into the boxes below.
Passport Type
Required · options: P - Popular Passport · PO - Official/
Public Service · PD - Diplomatic Passport For an ordinary passport, choose P - Popular Passport.
Passport Number
Required
Exactly as printed in your passport: letters and numbers only, no spaces, up to 15 of them.
Date of Expiry (DD/MM/YYYY)
Required
Type your passport’s expiry date as DD/MM/YYYY, for example 18/04/2033. The form’s legal notice asks for a passport valid for at least six months.
Gender
Required · options: Male · Female · Other
As shown in your passport: Male, Female, or Other.
Surname
Optional
Your family name as printed in your passport. It takes letters, numbers, and spaces only, with no hyphens or apostrophes. If your passport shows only one name, leave this box empty: the form requires Given Name, not Surname.
Given Name
Required
Your given names as printed in your passport, with the same character rules as Surname. A single name goes here.
Full Name
Required
Nothing to type: the site puts your Surname and Given Name together, surname first. You’ll see the result on the review page.
Date of Birth (DD/MM/YYYY)
Required
Type it as DD/MM/YYYY, for example 01/01/1990. It can’t be a future date.
Nationality
Required · 242 options, such as “Afghanistan”
On the first passenger’s card this box is grayed out: it shows the nationality you picked on the page before the form. On each passenger you add, choose that person’s nationality.
Email Address
Required
An address you can open right away: the 6-digit code you need to finish submitting is sent to the email you enter.
Country Code
Required · 212 options, such as “Vietnam (+84)”
Pick the country of your phone number. The list shows entries like Vietnam (+84); once you choose, the box shows only the code. The site may have filled it in from your nationality already, so check it matches your phone.
Phone Number
Required
Your number without the country code: digits only, 3 to 14 of them.
Relationship with lead passenger
Sometimes required · options: Spouse · Child · Parent · Sibling · Grandparent · Grandchild · Uncle /
Aunt · Cousin · Nephew / Niece · Colleague Shown on each passenger you add, not on the first card. Choose how this person is related to the first passenger, such as Spouse or Child. The form won’t move on while it’s empty.
I have read and understood this information.
Required
The checkbox under the visa notes. Read the notes and check it on every passenger card: until each card has it, the form won’t move on to Trip Information, and it shows no error saying why.
Visa Type / Purpose
Required · options: Electronic Visa (E-Visa) · Visa · Bilateral exemption · Unilateral exemption · Visa Exemption Certificate · Travel Card · Phu Quoc Visa Exemption · ABTC Card · Temporary Residence Card · Permanent Residence Card
What you enter Vietnam on. For an e-visa, choose Electronic Visa (E-Visa). Visa-exempt? Choose the exemption that applies: Bilateral exemption, Unilateral exemption, or Phu Quoc Visa Exemption. For Bilateral exemption and Unilateral exemption, the form checks your nationality and passport type against its own list and turns down a choice that isn’t on it.
Number
Sometimes required
Your visa or e-visa number: letters and numbers only, up to 25 of them. For an e-visa, copy the number on its Số / No. line, which is exactly 9 digits. Chose Bilateral exemption, Unilateral exemption, or Phu Quoc Visa Exemption? Then the form no longer requires this box; leave it empty.
Date of Issue (DD/MM/YYYY)
Optional
The date your visa or e-visa was issued, as DD/MM/YYYY; it can’t be a future date. With Bilateral exemption or Unilateral exemption you don’t type it: the form copies your arrival date in here and locks the box.
Date of Expiry (DD/MM/YYYY)
Sometimes required
The date your visa or e-visa ends, as DD/MM/YYYY. With Bilateral exemption or Unilateral exemption you don’t type it either: the form works the date out from your arrival date and locks the box, so a Japanese passport arriving on 21/09/2026 gets 04/11/2026.
Issued Place
Optional · the list depends on Visa Type /
Purpose Where your visa was issued. It stays locked until you choose a Visa Type / Purpose, and its list depends on that choice.
What goes in Trip Information?
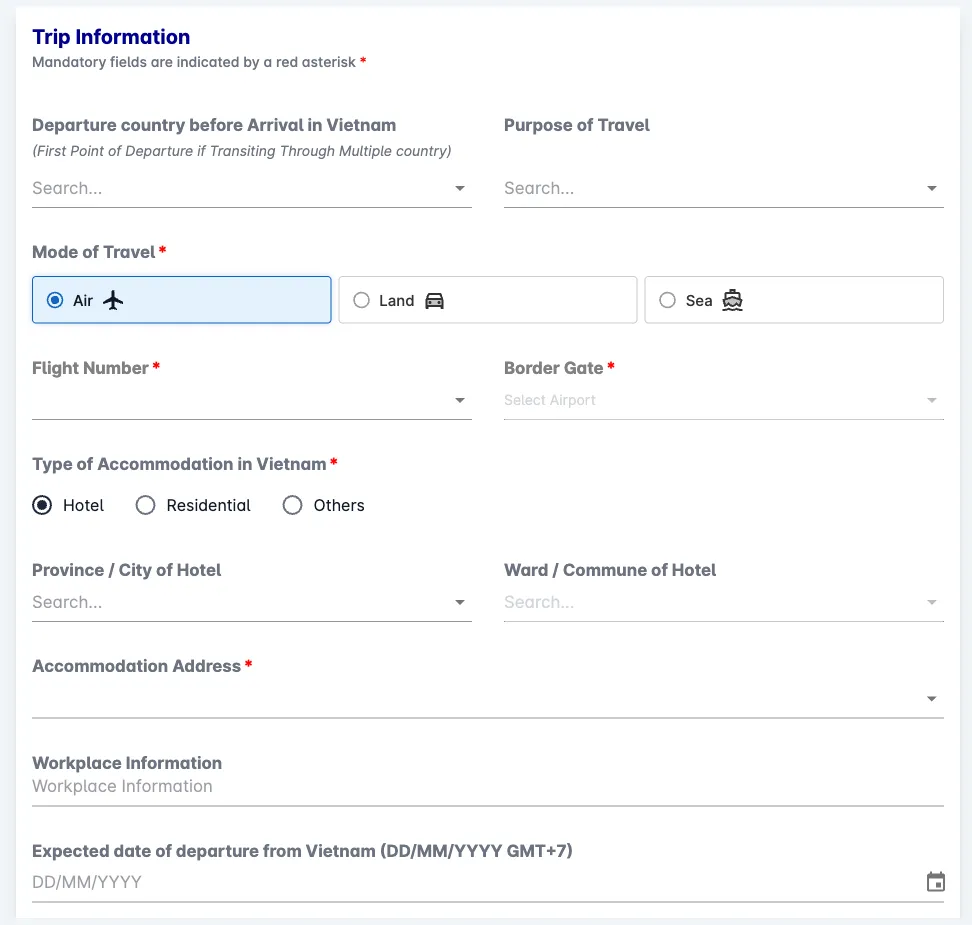
Departure country before Arrival in Vietnam
Required · 242 options, such as “Afghanistan”
The country you depart from right before arriving in Vietnam.
Purpose of Travel
Required · options: Business trip · Travel · Study abroad · Work · Transit · Other
Why you’re coming. For a holiday, choose Travel. Clearing immigration only to catch an onward flight? The form counts that as an entry, with Transit as its purpose.
Mode of Travel
Required · options: Air · Land · Sea
Air, Land, or Sea. Choose it first: changing it empties the transport number and border gate boxes below.
Flight Number
Required · by air, the portal’s flight list, plus Other
By air, look for your flight in the list. If it isn’t there, choose Other: a box for the flight number appears, and Border Gate below unlocks. By land or sea, this box is labeled Vehicle identification number, so type your vehicle’s number.
Enter flight number (e.g., VN1234)
Sometimes required
Appears after you choose Other in Flight Number. Type the airline code and number with no spaces, letters and numbers only, like VN1234.
Border Gate
Required · the list depends on Mode of Travel
Where you enter Vietnam. By air, the list has five airports: Tan Son Nhat, Noi Bai, Da Nang, Cam Ranh, and Phu Quoc. The box unlocks when you choose Other in Flight Number. By land, it offers Dong Dang Border Gate; by sea, 14 ports.
Type of Accommodation in Vietnam
Required · options: Hotel · Residential · Others
Hotel, Residential, or Others. Choose it first: changing it empties the province, ward, and address boxes below.
Province / City of Hotel
Required · 34 options, such as “Hanoi City”
The province or city where you’ll stay. Choose it before Ward / Commune of Hotel, which stays locked until you do; changing it empties the ward and address boxes.
Ward / Commune of Hotel
Required · the list depends on Province /
City of Hotel The ward or commune of the address. Its list depends on the province, so type part of the name to narrow it down.
Accommodation Address
Required · for a hotel, the portal’s hotel list, plus Other
Staying at a hotel? Type part of its name to search the list; if it isn’t there, choose Other and type the address in the box that appears. For other kinds of stay, this is a plain box for the address.
Enter Address
Sometimes required
Appears after you choose Other in Accommodation Address: type the street address of where you’ll stay.
Workplace Information
Optional
Where you work, if you want to add it; you can leave it empty.
Expected date of departure from Vietnam (DD/MM/YYYY GMT+7)
Optional
The day you plan to leave Vietnam, as DD/MM/YYYY. It can’t be before your arrival date.
What happens at Review & Submit?
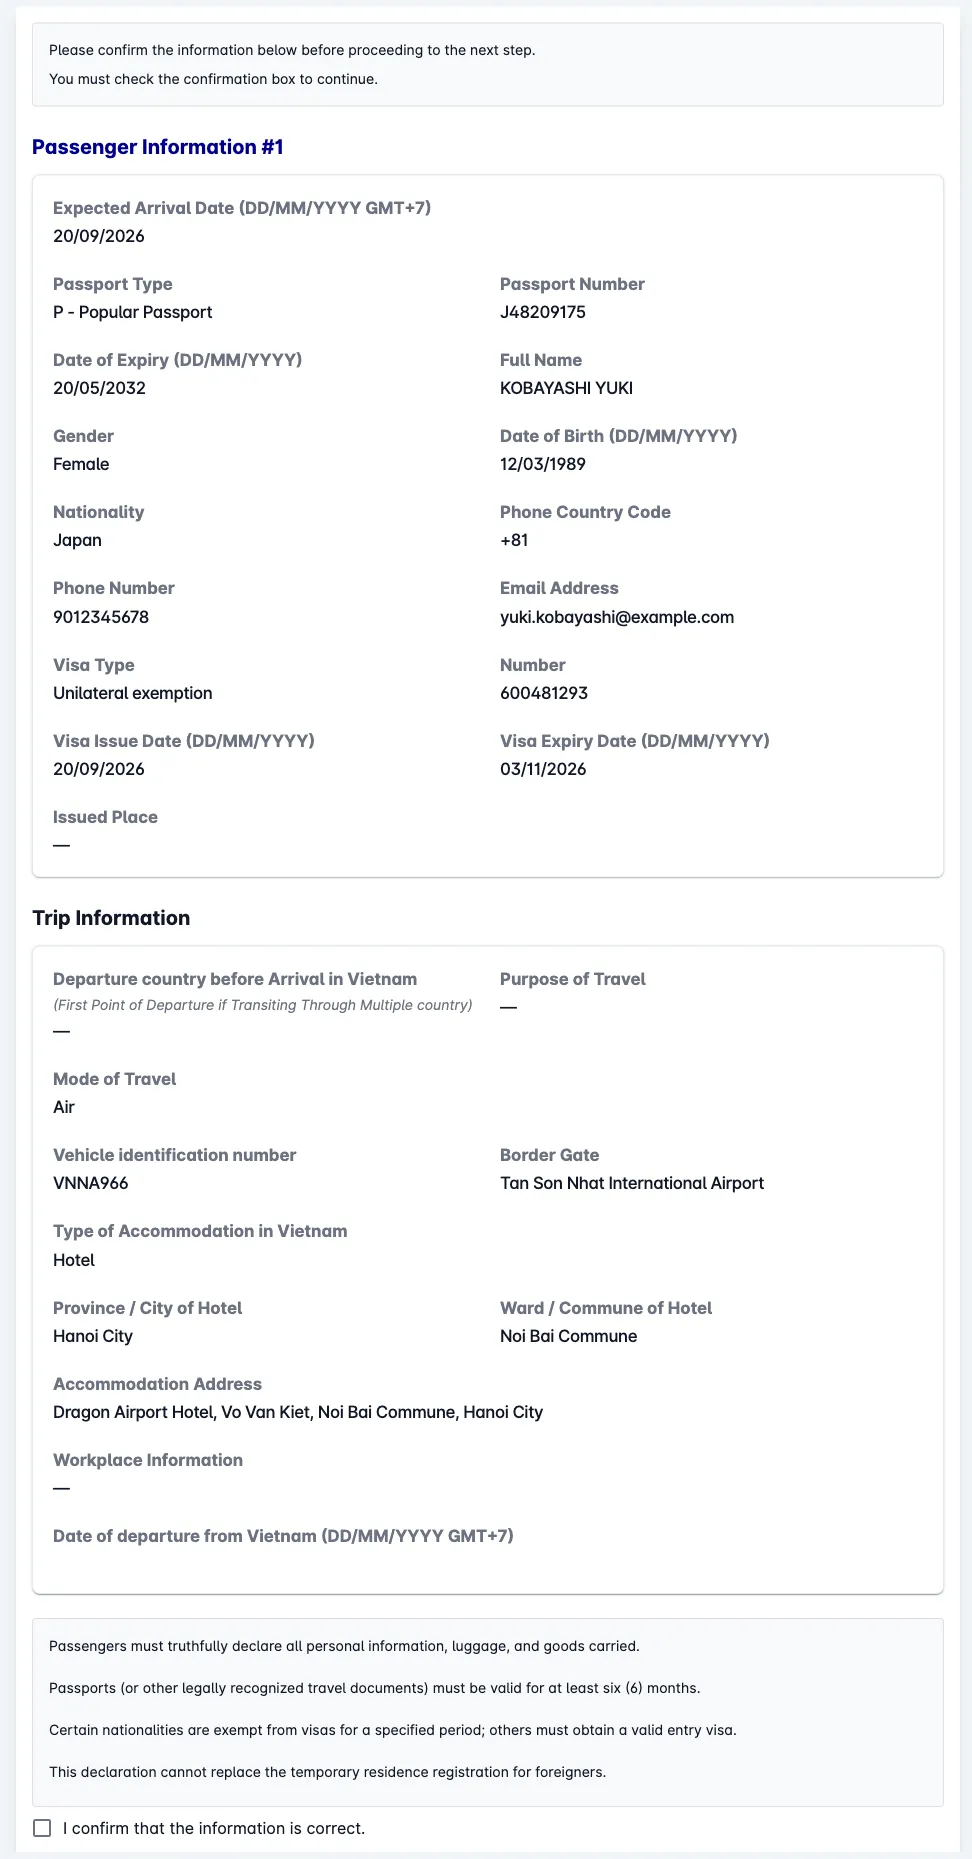
I confirm that the information is correct.
Required
The Review & Submit page lists everything you entered. Compare each value with your passport, then check this box. It is the only box on that page.
Verify your email
Required
After you click Submit, the site emails a 6-digit code to the address you entered. Type it in and click Verify. If it doesn’t arrive, you can ask for another after 60 seconds.
Filing for more than one traveler?
One submission can cover several travelers. On Passenger Information, click Add Passenger for each extra person and fill in their card; added cards also ask for Relationship with lead passenger. Check “I have read and understood this information.” on every card. Trip Information is filled in once for the whole group, and the portal states no limit on how many passengers you add.
How do you submit it?
- On Trip Information, click Review & Submit and check every value on the review page against your passport.
- Check “I confirm that the information is correct.” and click Submit.
- Enter the 6-digit code emailed to you and click Verify.
- When the site says “Your submission is successful!”, save the QR code or download the PDF, and keep your Pre-Arrival Information Number.
- Still waiting after Verify? If the site times out, its message says your declaration “has been successfully received by the system” and the result will be sent to your email.
- Spotted a mistake later? Lookup & Update Declaration on the portal’s home page lets you view, edit, or resubmit it with your PAI Number and passport number.
What’s next?
Three steps and one submission for the whole group: pick your arrival date from the three buttons, choose the right Visa Type / Purpose, and choose Other when your flight or hotel isn’t listed. Check the review page, then click Submit and enter the emailed code yourself.
- Open the official Pre-Arrival Information form on prearrival.immigration.gov.vn. It is free to fill in and submit there.
- Read the Vietnam Pre-Arrival Declaration guide for who is exempt, when to file, and fixing a mistake.
- Fill it in with visayes. You review every box and submit it yourself. Your first one-traveler form per country is free. visayes Premium fills in your whole group in one go.